The chat implementation is divided into Backend and Frontend parts:
Backend
API
Chat integration requires an API interface for exchanging data between the chat and the connected site to synchronize user information. For example, displaying the actual names and avatars of site users.
This file is an example of implements of all chat interfaces https://github.com/imbasynergy/ImbaChat-OctoberCMS/blob/master/controllers/apiChat.php
Authorization
All requests from ImbaChat to the integrated site contain data for authorization. The data allows you to verify that the request is sent from imbachat.com.
There are parameters in the widget setting window in the user account called API login andAPI password. They are transferred by accessing from the chat server to the connected site server in the Authorization header.
Example of authorization verification in php:
    $login = Settings::get('dev_login');
    $password = Settings::get('dev_password');

    if(!isset($_SERVER['PHP_AUTH_USER'])
            || ($_SERVER['PHP_AUTH_PW']!=$password)
            || strtolower($_SERVER['PHP_AUTH_USER'])!=$login)
    {
        header('WWW-Authenticate: Basic realm="Backend"');
        header('HTTP/1.0 401 Unauthorized');
        echo json_encode([
                "code" => 401,
                "version" => $this->getApiVersion()['version'],
                "error" => 'Authenticate required!',
                'debug' => ''
            ]);
        die();
    }
As you can see the API login andAPI password parameters in PHP from the widget settings in the user account on http://imbachat.com are placed in $ _SERVER ['PHP_AUTH_USER'] and $ _SERVER ['PHP_AUTH_PW']
Getting information about users
In the user account, there is a parameter Users info URL indicating where the chat should take information about users.
The chat will send a request to the Users info URL address, passing a list of user IDs for which information is needed.
In response, JSON is expected with the structure:
[
    {
        "user_id" : 6,
        "name" : "John",
    },
    {
        "user_id" : 6,
        "name" : "John",
    }
]
The user_id and name fields are required. Also, the chat can accept and process additional fields. An example of a more detailed answer with user information:
[
    {
     "user_id" : 6,
     "avatar_url" : "http://comet-server.ru/doc/CometQL/Star.Comet-Chat/img/avatar0.png",
     "name" : "John",
     "profiles" : {
                    "11" : {
                        "user_id" : "P11-A",
                        "avatar_url" : "http://comet-server.ru/doc/CometQL/Star.Comet-Chat/img/avatar0.png",
                        "name" : "P11-John",
                    },
                }
    }
]
Note that the response is expected as an array with information about one or more users.
An implementation example of a function for delivering user information
<?php

// credentials for getting users data from server:
$login = "root";
$password = "abc";

if(!isset($_SERVER['PHP_AUTH_USER']) || ($_SERVER['PHP_AUTH_PW']!=$password) || strtolower($_SERVER['PHP_AUTH_USER'])!=$login)
{
    // AUTH FAIL
    header('WWW-Authenticate: Basic realm="Backend"');
    header('HTTP/1.0 401 Unauthorized');
    echo json_encode([
                "code" => 401,
                "version" => $this->getApiVersion()['version'],
                "error" => 'Authenticate required!',
                'debug' => ''
            ]);
    die();
}

// AUTH SUCCESS

// getting array of user ids:
$id_array = preg_replace("/[^0-9,]/", '', $_GET['user_ids']);

// establishing database connection:
$db_connection = mysqli_connect("localhost", "user", "pass","bd", 3306);

// set users table:
$users_table = "ktvs_users";

// set user ID column:
$users_param = "user_id";

// getting users from the database by their ids:
$sql = "SELECT * FROM $users_table WHERE $users_param IN ( $id_array )";
$users_query = mysqli_query($db_connection, $sql);
$num_rows = mysqli_num_rows($users_query);
$result = [];

if($num_rows>0)
{
    while($rows = mysqli_fetch_assoc($users_query))
    {
        $user_id = $rows['user_id'];
        $user_name = $rows['display_name'];
        $login_date = $rows['last_login_date'];
        $badge = $rows['custom10'];
    if(!empty($rows['avatar']))
    {
            $avatar = "https://www.example.com/contents/avatars/".$rows['avatar'];
    } else {
            $avatar = false;
    }
        $link = "https://www.example.com/members/".$user_id."/";

        $result[] = array(
        'user_id' => $user_id,
        'name' => $user_name,
        'avatar_url' => $avatar,
        'profile_url' => $link,
        'lastlogin' => strtotime($login_date),
        'badge' => $badge
    );
    }
}

// JSON object with users data:
echo json_encode($result);
Connection
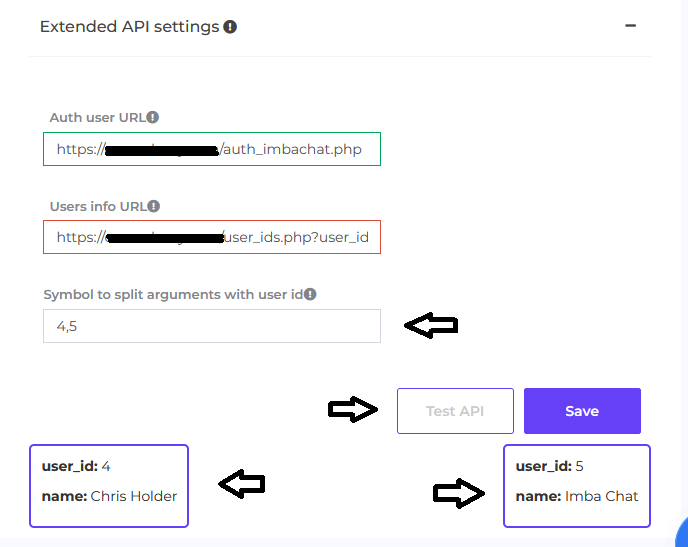
The received routers for authorization and information about users should be added in the admin panel settings and saved:
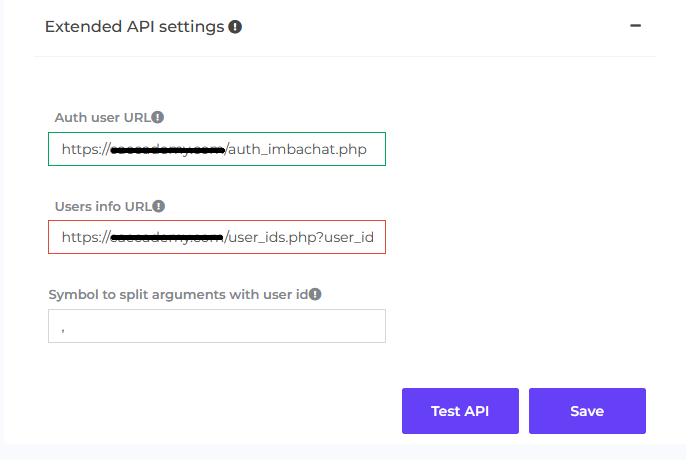
At the same time, the router api test, which is responsible for information about users during testig, should correctly return user information:
Frontend
Chat user authorization.
To authorize users of the connected site in the chat, you need to correctly generate the JWT token and pass it as the user_key parameter in the object with other chat initialization parameters.
To generate a JSON Web Token that will be accepted as valid, you need to have a secret key ( It is signed as Secret key in the user account). It can be obtained in the form of the widget settings on the site imbachat.com
An example of implementing a function for generating a token
function getJWT($user_id, $secret_key, $time)
{
    // Create token header as a JSON string
    $header = json_encode(['typ' => 'JWT', 'alg' => 'HS256']);
    $pass = $secret_key;
    $data = array();
    $data['exp'] = (int)date('U')+$time;
    $data['user_id'] = (int)$user_id;

    // Create token payload as a JSON string
    $payload = json_encode($data);

    // Encode Header to Base64Url String
    $base64UrlHeader = str_replace(['+', '/', '='], ['-', '_', ''], base64_encode($header));

    // Encode Payload to Base64Url String
    $base64UrlPayload = str_replace(['+', '/', '='], ['-', '_', ''], base64_encode($payload));

    // Create Signature Hash
    $signature = hash_hmac('sha256', $base64UrlHeader . "." . $base64UrlPayload, $pass, true);

    // Encode Signature to Base64Url String
    $base64UrlSignature = str_replace(['+', '/', '='], ['-', '_', ''], base64_encode($signature));

    // Create JWT
    return trim($base64UrlHeader . "." . $base64UrlPayload . "." . $base64UrlSignature);
}
The first argument is the Secret Key parameter, it can be changed in the widget settings in your Cabinet. The second argument is the id of the user in your database for which the JWT token is generated. The function will return the string that you use in the user_key parameter in the widget settings.
Example of calling a function to generate a token:
$user_id = 1;
$secret_key = 'lPXBFPqNg3f661JcegBY0N0dPXqUBdHXqj2cHf04PZgLHxT6z55e20ozojvMRvB8';
echo getJWT($user_id, $secret_key, 3600);
That is, by installing a chat widget on your website, you implement a user authentication system: when generating a page on which there is chat, the identifier of the user who requested the page is determined, and personally generate a token for it. Each user is authenticated in this scheme. Not the Secret Key, but the token that is generated using this key is already transferred to the frontend.
When chat receives a token from the user, it checks that it's generated using your key. And only after that, it gives access to the chat and a list of dialogs.
How to enable the widget
-
First you need to enable javascript of ImbaChat. It looks like that
<script src="http://imbachat.com/imbachat/v1/``DEV_ID``/widget"></script>, there is widget ID instead ofDEV_ID( look at the widget page ). -
Next we insert the chat download script
function imbachatWidget(opt){
if(!window.ImbaChat){
return setTimeout(imbachatWidget, 50, opt)
}
window.ImbaChat.load(opt);
}
imbachatWidget({
user_id: "<?= $user_id ?>",
token: "<?= getJWT($user_id, $secret_key, 3600) ?>"
});
Adding a new user to a dialogue. Widget API
Creating a dialogue between the current user and the user with id = 2 (for example, to implement the "Write message" button in the user profile). To create a dialog, call this function and pass the id of the user with whom you want to create a dialog as the first argument.
window.imbaApi.openDialog(2)Another articles:
-
MichaelWoodooQA 3 years agoSuccessful development wordpress live chat between users...
-
foosti 3 years agoComprehensive documentation! The ImbaChat website provides a valuable resource with detailed documentation that covers various aspects of the chat system. The documentation is well-structured, easy to navigate, and offers clear explanations along with code examples. It serves as a helpful guide for developers and users, ensuring a smooth integration and utilization of ImbaChat's features. Great resource for anyone looking to leverage the power of ImbaChat!
-
doosho 3 years agoExtensive and user-friendly documentation! The ImbaChat website offers comprehensive documentation that covers a wide range of topics related to their chat system. The documentation is well-organized, easy to navigate, and provides clear explanations accompanied by useful code examples. It serves as an invaluable resource for developers and users, facilitating a seamless integration and utilization of ImbaChat's features. Highly recommended for anyone seeking detailed guidance


