Step by step ImbaChat setup for WordPress
Step by step ImbaChat setup for WordPress: A complete guide
ImbaChat is a chat plugin that offers easy installation and customization for WordPress and Oсtober CMS. In this guide, we will focus on the step-by-step process of setting up ImbaChat for WordPress.
Installation
To install the ImbaChat plugin, follow the steps below:
- Access your site's admin panel and select Plugins -> Download plugin. Search for ImbaChat and install the plugin.

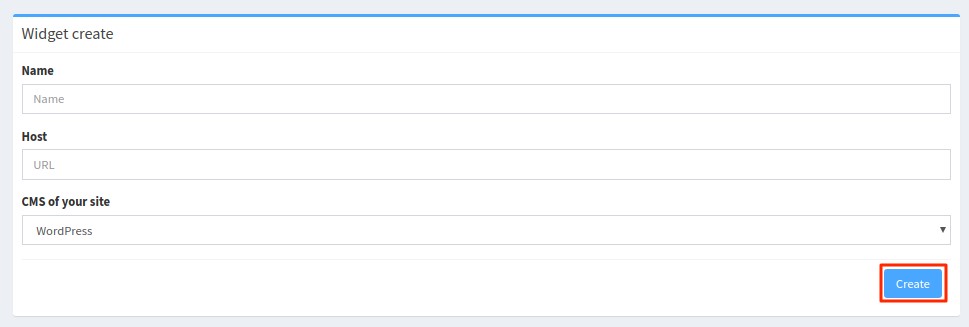
- Log in to ImbaChat and go to the Dashboard. Fill in the widget name and host fields. In the "Host" field, enter your site URL without the http:// prefix. Choose "WordPress" CMS integration and create the Widget. Enter the widget id into the "Widget id" field in the ImbaChat settings in the admin panel of your website. Click "Connect to the widget."

- If you haven't created a widget yet, click "Create a widget" on the same page. The connection between your website and the ImbaChat server will be automatically configured.


To customize the widget style and language, go to "Style settings" on the Dashboard of ImbaChat.com. For more information on widget customization, check out this post.
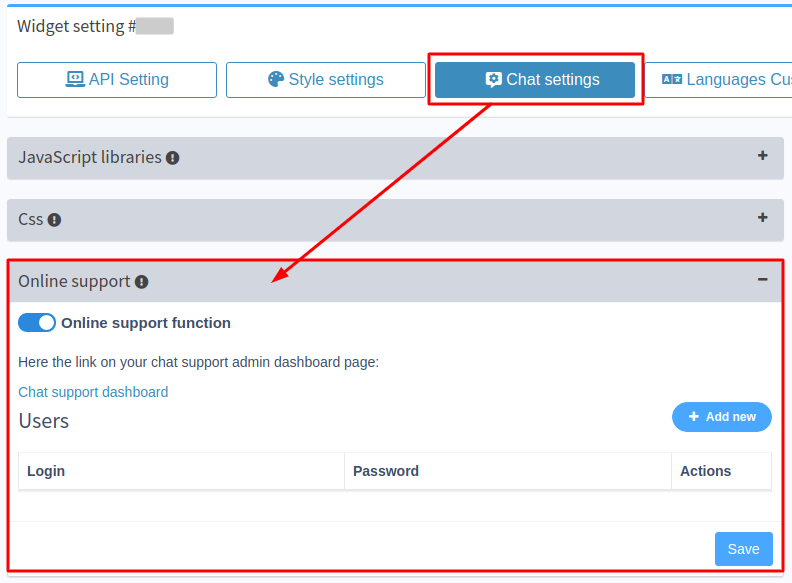
To enable the online support feature, go to Chat settings -> Online Support. You can enable the feature and create a new support manager account.

What's the next?
After installing you need to configure private and group chat for your users. For some WordPress theme it will configure automatically:
- BuddyPress
- Woocommerce
- wpForo
When you install a chat on these themes, the buttons Send a message appear automatically in the necessary places. In particular, the BuddyPress integration has additional features. You can read more about them in this post.
If the above-mentioned themes are not installed on your WP website, then you need to use special shortcodes to configure the chat. A shortcode is a short command for displaying a function. ImbaChat for WordPress has its shortcodes.
With the ImbaChat shortcodes you can create:
- Send a message buttons
- Buttons and fields for creating group chats
- Join group chat button
- Buttons to close and open chat
How to insert shortcodes:
Shortcodes:
1. Send a message button
This shortcode adds a button to the page, by clicking which, a dialog with the user opens
Parameters:
- id - user identification number on your site,
- class - the name of the class for the button (if there is a need to use your own styles and classes),
- name - button text,
Example:
[ic_open_dialog id=13 name="Write to admin" class="class_btn_msg"]If the user id is not passed or id = 0, then the dialog opens with the current post author.
2. Create a group chat button
The second shortcode adds a button that adds the user who clicked the button. The pipe parameter defines the group.
This shortcode generate on page two input field and a button. The first field Group name - This field corresponds to the name of the group that is being created. The second field Pipe - is responsible for the Unique identifier of the group (this parameter is used in the ic_join_group shortcode). By clicking the button, a group chat is created, which site users can join.
Parameters:
- classi - Class name for the input field
- classb - Class name for the button
- buttonname - button name
An application: Create a page for administrators, put a shortcode there and create the necessary groups through the ic_join_group shortcode.
Example:
[ic_create_group users="1,2,3" buttonname="Name of button" classi="class_of_input" classb="class_of_btn"]3. Join group chat button
Parameters:
- classb - Class name for the button
- buttonname - button name
- pipe - Parameter from Create a group chat button Shortcode, needed to understand which group to connect the user to. Example:
[ic_join_group classb="class_btn" buttonname="join group" pipe="group_example_1" title="The title of group"]4. Open and close chat button
There are no parameters. Creates a button that opens a chat and a button that closes the chat.
Example:
[ic_close_chat]
[ic_open_chat]
After that your ImbaChat widget is ready.
If you need to display a shortcode somewhere in an arbitrary place in the template.
Example:
<?php $id = get_the_author_meta("ID"); echo do_shortcode( "[ic_open_dialog id = {$id} name = \"Write to administrator\" class = \"class_btn_msg\"]" ); ?>
where $id = get_the_author_meta("ID"); //passing the id of the current post author.
Thus, before adding a shortcode or php code to the template, you must get it through the function or explicitly set the id number.
If you do not pass the user id, then the id of the author of the current article will be selected. Then the code will be like this:
<?php echo do_shortcode( "[ic_open_dialog name = \"Write to administrator\" class = \"class_btn_msg\"]" ); ?>
We hope this article was helpful for you. You can get free installation service and technical support. Contact us by E-mail or Telegram.
More useful articles:
-
Valeria 3 years agoThank you for the clear explanation of wordpress shortcode with parameters.
-
pook 2 years agoExcellent step-by-step guide for setting up ImbaChat! The article provides a detailed walkthrough, making it easy to follow along and configure ImbaChat on your website. I found the instructions and screenshots very helpful in ensuring a smooth setup process. ImbaChat seems to offer a comprehensive set of features for enhancing real-time communication on websites. Highly recommended for anyone looking to integrate chat functionality!
-
greak 2 years agoThis article offers a comprehensive, step-by-step guide for setting up ImbaChat. The instructions are presented in a clear and detailed manner, making it easy to follow along and successfully integrate ImbaChat into your website. The inclusion of helpful screenshots and code snippets further enhances the understanding of each setup step. It's an invaluable resource for anyone seeking to enhance their website with a robust chat solution.
